The techniques described below are listed roughly in order from simple to more complex. Naked Single and Hidden Single methods help you identify the correct number to place in a square. The remaining techniques eliminate potential candidates until you can identify the correct number to place in a blank square.
If the correct entry is not obvious, pencil all possible candidate numbers into that square. Then using your penciled-in numbers and the logic shown in these techniques, you can eliminate incorrect candidates.
Don't guess. And if you approach Sudoku competitively, take care in your haste. If you make a mistake, it is tricky to undo the all the wrong entries after a mistake.
Logic Techniques for Solving Sudoku

Puzzle 1
Naked Singles
Squares in a Sudoku grid with only one valid candidate are called "naked singles." They are sometimes called "sole candidates" or "singletons."
The most obvious example is a row, column or block with just one blank square. In Puzzle 1 the only valid entry for each of the shaded squares is a 6 because that is the one number that is missing.

Puzzle 2
In Puzzle 2 the naked single is not as obvious as in Puzzle 1. However, scanning the row, column and block for each shaded square reveals that 4 is the only the number not already present in the row, column and block for that square.

Puzzle 3
Hidden Singles
Hidden Singles (sometimes called "unique candidates") are squares which have more than one possible candidate, but only one of the candidates cannot be placed in any other square in that row, column or block.
In Puzzle 3, the shaded squares show multiple, valid candidates for those squares. But given the other (yellow) puzzle squares that already have an 8, the shaded squares are the only place an 8 can go.
You can also spot hidden singles by comparing penciled-in candidates. The image below shows candidates for each blank square in the second row. Notice that 8 appears as a candidate only once in the row. The unique candidate is "hidden" among the other possible candidates. You can look for hidden singles in the same way for columns and blocks.


Puzzle 4
Block With Column-Row Interactions
You may be able to eliminate candidates as a result of interactions between a block, column and row. This is also called a "pointing pair."
In Puzzle 4 the (yellow) 2 in the third row means one of the shaded squares in the top-middle block must contain a 2. We don’t know which one yet. But because one of them will contain a 2, there cannot be a 2 in any of the other squares in that column.

Puzzle 5
Block-Block Interactions
In Puzzle 5, because of the yellow squares with a 9, the shaded squares are the only locations in their block that can contain a 9. We know a 9 will go in two of those eight shaded squares in rows four and five. Therefore you can eliminate 9 as a candidate from any other squares in rows four and five.

Puzzle 6
A similar block-to-block interaction can occur with just four squares, as shown in Puzzle 6.
If a number only appears twice in two blocks in the same row or column, that number can be removed from others squares in those rows (or columns).
Again, the shaded squares are the only location for the number 9 in those two blocks. Because a 9 will fill one shaded square in row four and one in row five, any other 9 in those rows can be eliminated.

Puzzle 7
Naked Pairs
When two squares in the same block, row or column have only the same two numbers as candidates, those two numbers can be eliminated as candidates in any other squares in that same block, row or column.
In Puzzle 7, the shaded squares in the middle block must contain a 7 or 9. We don’t know yet which square will have the 7 and which will have the 9. But, we do know that no other squares in that block can contain a 7 or 9.
The same is true for the two shaded squares in row nine. Because the shaded squares can only have a 7 or 9, both 7 and 9 can be eliminated as candidates from any other squares in that row.

Puzzle 8
Hidden Pairs
The Hidden Pairs technique allows you to eliminate candidates within squares that contain a hidden pair. Like a “naked pair,” a hidden pair consists of the same two numbers that are candidates in only two squares in a block, row or column. The pairs are “hidden” because those squares have additional candidates.
The two squares with the hidden pairs must contain those two numbers, so those squares cannot have any other candidates.
In Puzzle 8, the two shaded squares in column eight are the only squares in that column which have candidate numbers 3 and 6. The other possible candidates in the shaded squares can be eliminated.

Puzzle 9
Naked Triples
When three squares in the same block, row or column have any of the same three numbers as their only candidates, those three numbers can be eliminated as candidates from other squares in that same block, row or column.
In Puzzle 9, the shaded squares in the middle block must contain a 3, 4 or 8. Therefore, no other squares in that block can contain a 3, 4 or 8.
In Puzzle 9, the shaded squares in the middle block must contain a 3, 4 or 8. Therefore, no other squares in that block can contain a 3, 4 or 8.

Puzzle 10
Puzzle 10 shows a grid where a naked triple occurs, even when not all three numbers are present in all squares of the triple. It is still a naked triple, because none of the squares in the triple contains an outside candidate. Each square in a naked triple can have all three numbers as candidates or just two of the three.
Together, the three shaded squares contain three numbers: 3, 4 and 8. They include no other candidates. This allows candidates 3, 4 and 8 to be eliminated from other squares in the middle block.
Together, the three shaded squares contain three numbers: 3, 4 and 8. They include no other candidates. This allows candidates 3, 4 and 8 to be eliminated from other squares in the middle block.

Puzzle 11
Hidden Triples
Like a “naked triple,” a hidden triple consists of three candidate numbers that only appear in three squares in a block, row or column. It is not necessary for all three candidates to appear in each of the three squares, but they must not appear in other squares. The triples are “hidden” because there are additional candidates in their squares.
This technique lets you eliminate other candidates within the "hidden triple" squares.
In Puzzle 11, the three shaded squares in the top-left block are the only squares in that block which have candidate numbers 2, 6 and 9. The other possible candidates in the shaded squares can be eliminated.
This technique lets you eliminate other candidates within the "hidden triple" squares.
In Puzzle 11, the three shaded squares in the top-left block are the only squares in that block which have candidate numbers 2, 6 and 9. The other possible candidates in the shaded squares can be eliminated.

Puzzle 12
X-Wing
You can use the X-Wing technique when a candidate number appears at all four corners of a rectangle, AND it is not a candidate in any other square for either the rows or the columns forming the sides of the rectangle. The candidate number only needs to be absent from either the two rows or two columns, but not both the rows and columns, or there would be no candidates to eliminate. This X-Wing configuration lets you eliminate that number from other squares in either the rows or columns in which it appears as a candidate.
In Puzzle 12, the four shaded squares show that number 2 is a candidate at the corners of a rectangle formed by rows one and four and columns three and nine. Also the number 2 does not appear as a candidate for any other squares in columns three and nine.
Because one pair of diagonal corners of the X-wing rectangle will hold the 2s, the number 2 can be eliminated as a candidate in any other squares in rows one and four.

Puzzle 13
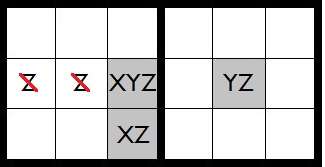
XY-Wing
The XY-Wing technique can be used when three squares each contain two candidates that are part of a 3-candidate set {XYZ}. The base square of the XY-Wing will contain candidates XY. Each wing square must be a “buddy” (share a row, column or block) to the base square. One wing will contain XZ and the other will contain YZ.
Regardless of whether the base square ultimately contains X or Y, one of the wing squares will be a Z. As a result, Z can be eliminated as a candidate from any squares that are buddies to both wing squares.
In Puzzle 13, the shaded squares form an XY-Wing pattern, with the square containing the {1,4} pair as the base. The shaded squares containing {1,6} and {4,6} are the wings. Whether the base square ends up holding a 1 or a 4, one of the “wing” squares must hold a 6. Therefore if a 6 appears as a candidate in any square in the same row, column or block as both “wing” squares, it can be eliminated.

Puzzle 14
In Puzzle 14, the shaded squares form an XY-Wing pattern, with the square containing the {1.9} pair as the base. The squares containing {1,4} and {4,9} are the wings. Whether the base square ends up holding a 1 or a 9, one of the “wing” squares must hold a 4. Therefore the number 4 candidates appearing in squares in the same row, column or block as both “wing” squares can be eliminated.
In the square at row four/column four, candidate number 4 can be removed because it shares both a column with wing pair {1,4} and a block with wing pair {4,9}. Candidate number 4 can also be removed from the square at row seven/column 5, because it shares a row with pair {1,4} and a column with pair {4,9}.
In the square at row four/column four, candidate number 4 can be removed because it shares both a column with wing pair {1,4} and a block with wing pair {4,9}. Candidate number 4 can also be removed from the square at row seven/column 5, because it shares a row with pair {1,4} and a column with pair {4,9}.

Puzzle 15
XYZ-Wing
The XYZ-Wing pattern is similar to the XY-Wing, except the base square contains all three candidates in the set {XYZ}. The candidate that appears in all three squares can be eliminated from other squares (there will never be more than two) which are “buddies” (share a row, column or block) with all three squares in the XYZ-Wing. See the following illustration.
In Puzzle 15, the shaded squares form an XYZ-Wing pattern for candidates 1, 2, and 4. One of these squares must hold a 2. Because the square at row six/column nine shares a row or block with all three shaded squares, the number 2 can be eliminated as a candidate from that square.
In Puzzle 15, the shaded squares form an XYZ-Wing pattern for candidates 1, 2, and 4. One of these squares must hold a 2. Because the square at row six/column nine shares a row or block with all three shaded squares, the number 2 can be eliminated as a candidate from that square.

Puzzle 16
XY Chain
This solving technique allows you to eliminate candidates identified by following a chain of “buddy” squares which each contain only two candidates.
In Puzzle 16, the shaded squares are ends of an XY-Chain pattern. Starting with the square at row six/column three, it can either be a 1 or a 7. If it is a 7, then the square at row six/column seven must be an 8. Continuing on, the square at row five/column seven must be a 7, the square at row five/column four must be a 3 and the square at row five/column eight must be a 1. So one of the shaded squares must contain a 1. Therefore, any squares that are “buddies” to both shaded squares cannot contain a 1.
You can also follow the chain the other direction, starting at row five/column eight. That square is either a 1 or a 3. If it is a 3, following the chain indicates the other end square must be a 1. Again, one of the two shaded end squares must contain a 1.

Puzzle 17
Coloring
Coloring (also called "Single Chains") is a way to follow a candidate chain where the candidate appears exactly twice in a row, column or block. Alternating colors when one or the other candidate must be correct helps you spot inconsistencies that will allow you to remove candidates.
As an example, in Puzzle 17 we can color the chain of number 3 candidates starting in row one/column two. We will color that square blue. Whether that square does or doesn’t contain a 3, the squares at row six/column two and row one/column eight will be the opposite. We will color those squares orange. One end of the coloring chain stops at row six/column two, because there is more than one other square in its row and block with a 3.
At the other end of the chain, if the square at row one/column eight is orange, then the other square in that block containing a candidate 3 (row three/column seven) must be the opposite and we can color it blue. Then the candidate 3 in row six/column seven would be orange.
Coloring this chain reveals two orange squares in row six. Because the same candidate cannot appear twice in the same row, all the orange squares in the chain must not contain the candidate 3 and all the blue squares will hold the number 3.

Puzzle 18
Forcing Chains
Forcing Chains are also known as a “Double-Implementation Chains.” It occurs when a square with only two candidates determines (or forces) the content of another square, regardless of which candidate in the first square is selected.
This solving technique allows you to eliminate candidates identified by following a chain of “buddy” squares which each contain only two candidates.
In Puzzle 18, the shaded square in row nine/column one can contain either a 3 or 5. Assuming the 5 is correct and following the blue chain shows that the square at row one/column six must also be a 5. If we assume the 3 in the shaded square is correct and follow the orange chain, the square at row two/column nine must be a 5.
The yellow square at row two/column five can contain a 4 or 5. But because the yellow square is a buddy to both ending squares of the chains (one of which must contain a 5 and in this grid both will contain a 5), we know that regardless of which number is in the shaded square, the yellow square cannot contain a 5.
In determining that the yellow square must be a 4, we can eliminate any other number 4 candidates from row two, column five and the top-middle block.

Puzzle 19
Naked Quads
Naked Quads are like the other naked subsets but with four candidates in four squares in a single block, row or column. Like “naked triples” it is not required that all four of the naked quad candidates appear in each of the four squares, only that no other candidates appear in the naked quad squares. You can use this technique to eliminate the naked quad candidates from any other squares in the same block, row or column.
In Puzzle 19, the four shaded squares in the top-left block show the naked quad candidates: numbers 4, 5, 7 and 8. Because those numbers must appear in the four shaded squares, they can be eliminated as candidates in other squares in that block.
In Puzzle 19, the four shaded squares in the top-left block show the naked quad candidates: numbers 4, 5, 7 and 8. Because those numbers must appear in the four shaded squares, they can be eliminated as candidates in other squares in that block.

Puzzle 20
Hidden Quads
Hidden Quads are like the other hidden subsets but with four candidates in four squares in a single block, row or column. They are “hidden” because other candidates also appear in the “hidden quad” squares. Like “hidden triples” it is not required that all four of the naked quad candidates appear in each of the four squares, only that they do not appear in other squares in the block, row or column. You can use this technique to eliminate other candidates within the naked quad squares.
In Puzzle 20, the four shaded squares in the top-left block show the hidden quad candidates: numbers 2, 3, 6 and 9. Other candidates in the hidden quad squares can be eliminated.
In Puzzle 20, the four shaded squares in the top-left block show the hidden quad candidates: numbers 2, 3, 6 and 9. Other candidates in the hidden quad squares can be eliminated.